Any suggestions, recommendations or ideas found on this site are applied at your own risk.
Backing data up
Every year for the past 20+ years we've been in this business, we have seen a lot of people that lost all of their data for one reason or another.
We can't state the importance of this enough! Back up on a regular basis and to multiple media.
Some notes before we get started:
-
Applications have many individual files that are interdependent on other files and restoring one may further corrupt everything. Instead of attempting to restore an application's file your better bet is to do a "repair" from Programs and Features or just reinstall the application. (see our January '15 newsletter)
-
Data files may also be interdependent so again, care needs to be taken. Accounting data files almost certainly fall under this situation. Most have individual data files for AP, AR GL, etc., so restoring just one will corrupt everything. In the case of accounting applications, use that application's backup/restore utility (and back up often using that utility).
-
Backing up as discussed here does not create system restore points that could be used to recover from corrupt updates, drivers, etc. See Windows restore for that.
-
If you have an external (or mapped) drive, ransomware can encrypt all of that data too! Be sure to rotate external backup drives often and avoid mapping drives when possible.
Everything below assumes you have a back up device such as a flashdrive, an external drive(s) or rewriteable CD (but CD's are not recommended). Microsoft articles on Windows 7 and 8 built-in backup system and Windows 10 backup.
But they are a bit cumbersome especially if you want to restore a file (see another way to restore a file). The Windows built-in system does not seem to police disk space very well. It may just error out when the destination drive is full and worse, you may not even know it's out of space so check on it once in a while!
|
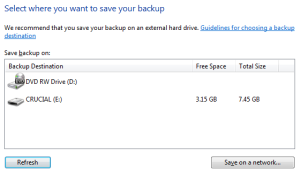
If you want to use the built-in backup, search the computer for the word "backup" or use Windows Run command and type sdclt. The first time you use it you need to click the Set up backup link (not shown). You are presented with a list of acceptable backup devices, select the one of interest and click next (or click Save on a network if so desired). Next you'll choose to; let Windows decide on what get's backed up or manually select the folders you want to backup (not shown). |
 |
|
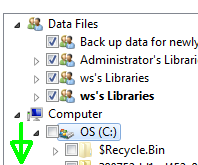
Manual selection is needed when you have any applications that save data outside the normal user folders (Documents, Pictures, etc.). With the manual selection process you will be presented with a screen that looks like this where you need to locate and select those other folders, which reside elsewhere on the C: (or another) drive. Place a check mark in the box next to the desired folder(s). |
 |
Click next then click to Schedule and run the backup.
Scheduled backups will occur only if the computer is running. They cannot execute if the computer is in hibernation or sleep, so select a day/time that the computer will be running, or change the power settings to not hibernate/sleep. See Power settings in our June '13 Newsletter.
Manage disk space
As mentioned above and in our March '13 newsletter, Windows backup does not manage the disk space. It may just continue to backup until the device is full and then fail without notice.
|
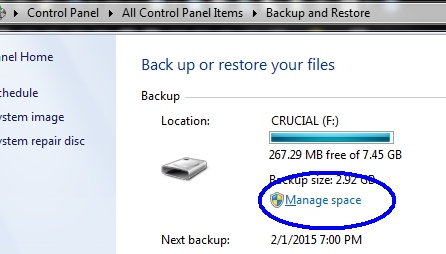
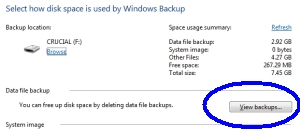
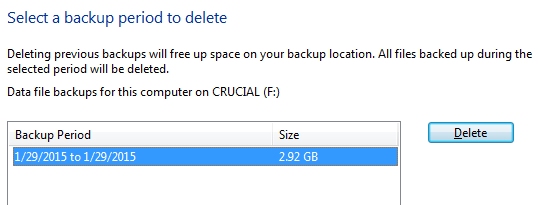
If you use the Windows built-in back up system, check on it once in a while. From the Control Panel (small icon option), select Backup and Restore. Click the Manage space link. That will open this screen where you click to View backups...
|
 |
|
From there simply select and delete older backup periods as desired. If your first/original backup contained everything, you may want to keep it and delete some backups that followed... |
 |
System Image/Repair
In the initial Windows (built-in) backup screen, there may be a couple of options (upper left) and it's probably a good idea to do both. See also our Windows Restore article.
-
Create system image. This could require dozens of DVD's so use an external drive or large flash drive. This image would be used in the event you need completely wipe and bring the computer back to the condition as of the date the image was made. We are assuming this will create a bootable system that could be used in the event of a drive replacement.
-
Create system repair disk. DVD Only, this can be used to boot the computer in the event of a serious Windows corruption, but it is only a repair disk. If the drive fails and you have to install a new drive, this does not contain the Windows reinstallation files.
Note: If your computer did not come with an actual Windows Operating System disk, you should make this repair disk!
-
Many computer manufacturer's disks are complete restoration kits, which do not have the necessary OS files to do a repair, instead they wipe the computer and reload everything.
-
From our October '13 Newsletter - one more piece of advice:
Computers are simply not shipped with restoration disks anymore, rather the manufacturers expect you will build them. Most have a utility to do so and most will pop up a reminder until you either build the disks or dismiss the reminder. Create the disk kit (or flash drive)!
If you find your computer is corrupt or infected, or you simply want to do a factory restore and have not made the disks, some computers have a key combination to launch the repair mode, see our notes page. Windows 8 machines may not have that repair from boot hot key available, but there is still a way to build those disks. See this Microsoft article.
-
Now even more important to have them as the manufacturers are starting to charge a lot! We recently spent over 20 minutes and $80 to get recovery disks from Sony and for another computer, 15 minutes and $70 from Lenovo and really frustrating, a restore drive from HP that did not work and they would do nothing to help us resolve the problem.
So with all that out of the way, rather than using the built-in backup system, we prefer the simple batch file shown below. Restoring a file cannot be automated, but it is as simple as opening one of the back up folder (dated) then copy the desired file(s) back to the Desktop (or original file location).
Data backup with a batch file
While batch files are handy and can
automate a lot of work, a mistake in the code could be disastrous!
Know what you are doing and test before implementing!
And keep in mind, any open files are skipped during a backup so best to close everything, maybe even reboot the computer before backing up...
See Windows command line tools for more information.
Create a batch file: Open notepad (Windows+R), enter
the 2 backup lines as shown below, then save as...
Change the Save as type
to; All files then type a file name to include the ".bat" extension,
e.g. Backup.bat
CD\
SET TODAY=%DATE:/=-%
xcopy /e /i /c /y "c:\users\*.*" "g:\username\%TODAY%\"
Notes:
- g: is the destination drive. Your external drive is likely something different so look in "Computer" and obtain the proper drive letter. See Drive letter assignment at bottom.
- username is optional. If a specific username is not used be sure there's only one slash, so: "g:\%TODAY%\"
- If the batch file creates a folder only with the
weekday, e.g., Fri instead of Fri 01-22-2016 (why some
computers do this we do not know off hand), change to a simpler date theme, use (exactly) this:
SET TODAY=%date:~-4,4%%date:~-7,2%%date:~-10,2%
Which then creates the folders as: YYYYDDMM
Some of Xcopy switches:
- /e all subfolders OR
- /s Copies directories and subdirectories except empty ones.
- /y suppresses prompt to overwrite
- /c continues even if errors (will skip files that are open, e.g. Outlook's PST data file if Outlook is open)
- /i If destination does not exist and copying more than one file, assumes that destination must be a directory.
- /h includes hidden files/folders
- Note: C:\Users\*.* is Windows Vista, Windows 7 and Windows 8.
- For Windows XP that would be "C:\Documents and Settings\*.*" and must be within quotes...
|
SET TODAY=%DATE:/=-% Assigns the current date to the variable named TODAY - Each time the batch file is run, it makes copy named as the current date. This way you can go back many weeks or even months to retrieve data. If username is included, the dated folders would reside under that username folder. |
 |
Once you have saved the batch file, simply double click the icon to backup. You can also schedule this to run via Windows Task Scheduler available from the Control Panel > Administrative tools...
Very Important: You must check up on the backup drive on occasion to make sure the drive is not too full. So once in a while, go into the drive and delete old backups.
If however, you feel confident programming DOS commands, Google search "forfiles delete folder" and you can automate deleting folders older than xx days. Below is what we use.
Forefiles
There are variations of Forefiles on the Internet and we can no longer find a safe download site. If you do obtain it someplace, we have found the below command line works with forefiles dated 11/30/2011. If you obtain one with a different date, you may have to rework the batch file command line. See this Microsoft article on forfiles.
Forefiles can wipeout all of your data before you know what happen! You need to be very careful programming and using it - test and retest before implementing anything.
We found it best to place forfiles (and everything else) on the root and run them from there. But doing so, you need to specifically have your batch file run on the root rather than from a folder. Hence you will find the command "cd\" at the beginning of the example batch files.
We know just enough about this utility to be dangerous, but this single command line seems to work for us. So our entire backup batch file looks like this:
CD\
ForFiles /P g:\ /D -15 /C "CMD /C if @ISDIR==TRUE echo RD /Q
@FILE &RD /Q /S @FILE"
SET TODAY=%DATE:/=-%
xcopy /e /i /c /y "c:\users\*.*" "g:\username\%TODAY%\"
Breaking that forfile command apart:
- forefiles (the program command)
- /P (instructs forfiles the next piece of information is the path to work in. In our example, the g: drive)
- /D (date command)
- -15 (any folder older than 15 days)
- /C (and beyond is the instruction to remove all directories matching the 15 day criteria)
Drive letter warning
Your external drive could change if you plug in (or unplug) other devices like cameras,
phones, etc.
If so the batch file will not run properly. Check under "Computer" to
insure the assigned drive letter matches the batch file's drive letter. It's possible (but not
likely) the batch could attempt to backup your files to another device if that
other device took over the batch file's assigned drive. So check the
external's drive letter on occasion.
|
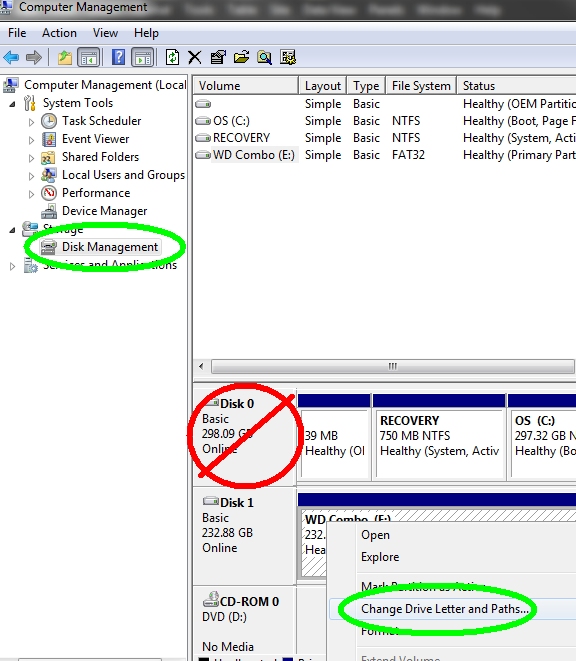
You can assign the external drive a permanent, higher drive letter to reduce the chance of it changing. To do so, Right click "Computer" and select Manage. When that opens, select Disk Management and there you will Right click the external drive and choose Change drive letter. But be VERY CAREFUL in here. Changing a drive letter assignment can have adverse affects on the system. Accidentally changing the boot drive will make the computer completely unusable! Typically the boot drive is Disk 0 (zero), but there could be conditions where it is some other assignment. Look for something else to identify the external, in this example, WD Combo... |
 |